|
Digit-Eyes now offers no-charge access to registered users
who want to use a fob-type laser scanner with their phone
We have tested two laser scanners that can use Bluetooth to pair
with the iPhone, iPad or iPod and provide keyboard-style input
to Digit-Eyes when running in a browser. We don't
recommend the Scanfob® 2002 unless you have some
vision because it only scans horizontally and many codes are in
a vertical orientation. However, if you have enough
vision to be able to determine the orientation of the bar code,
the ScanFob 2000 is considerably less expensive than the KDC300.
For a complete review of the two scanners and their
differences, click here.
This tutorial describes how to attach and use the Scanfob
2002.
Configuring the Scanfob 2002
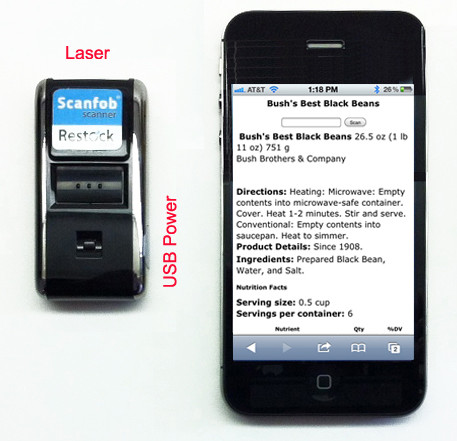
The Scanfob 2002 is rectangular in shape; about 2.5
centimeters (one inch) in the short direction, about 5
centimeters (2 inches) in the long direction and about 1
centimeter (0.5 inch) thick. One of the long sides
has a connection for the power cable; the laser is located on
one of the short ends. This end can be distinguished by
the smooth glass surface that covers the laser.
There is a large button located on one of the large
rectangular sides. This is the button that activates
scanning. Below it, there is a small button that is used
for other control.
The smaller button is used with Digit-Eyes to turn the device
on and off as a keyboard input to the iPhone, iPad or iPad
(sometimes called the "iDevices".)
We found the instruction sheet shipped with the Scanfob was
not usable without vision and created two new instruction pages
and a configuration procedure that does not require vision.
- First, using the cable supplied with the device, plug it
into a powered USB port and leave it to charge. This
will take about 4 hours. The Scanfob has colored LEDs
on the top side. They will show red before the
unit is fully charged and green when it is charged.
- The Scanfob is configured using control and numeric codes
that are scanned using the Scanfob 2002 itself.
The sheet provided with the product isn't usable unless you
are sighted, but we've created two pages that you can print
and use without vision. The first page contains
control codes and the second contains the numeric codes that
have to be used when pairing the device..
- Create the control code sheet.
- If you are printing on US standard 8.5 x 11 inch paper, click here to open a new window that will
download a pdf that has the codes used to configure the
Scanfob 2002 scanner or click here to open a new window that will
download the same documentation in Microsoft Word
format.
- If you are printing on A4 paper, click here to open a new window that will
download a pdf that has the codes used to configure the
Scanfob 2002 scanner or click here to open a new window that will
download the same documentation in Microsoft Word
format.
The instructions are designed to be used without
vision. Print this page, then fold the page once
horizontally and once vertically so it is divided into
four parts.
- Create the numeric code sheet.
- If you are printing on US standard 8.5 x 11 inch paper, click here to open a new window that will
download a pdf that has the numeric codes or click here to open a new window that will
download the same documentation in Microsoft Word
format.
- If you are printing on A4 paper, click here to open a new window that will
download a pdf that has the numeric codes or click here to open a new window that will
download the same documentation in Microsoft Word
format.
Print the page, then fold the page in half vertically
and then in half vertically again. Unfold it and
fold it in half horizontally and then fold it in half
again horizontally so that there are twelve cells that
can be distinguished by the folds.
- Start with the control code sheet (the one divided into
four parts.) Use the Scanfob to scan the code that is
located in the middle of the top left section of the
page. This sets the Scanfob to HID Keyboard
input mode. The Scanfob will beep with a warbling tone
when it recognizes the code.
- On your iPhone, iPad or iPod, select the
"Settings" option, then "General" and
then "Bluetooth". Turn Bluetooth on if
it is not on already.
- Get the numeric code sheet. You will have a
fairly short time to enter the numeric codes, so be sure you
know where the numbers are on the sheet. The
first row contains only instructions. The second
row of cells contains the numbers 0, 1, 2 and 3.
The third row of cells contains 4, 5, 6 and
7. The last row contains the values 8 and
9 in the left two cells and the "END" code in the
right most cell.
- Pair the phone and the Scanfob:
- Hold down the small button on the Scanfob for 5
seconds.
- It will start a fast beeping and the value
"Scanfob-2" will show on the device list of
the iPhone with a status of "not
paired". Touch the option on the iPhone
(or iPad or iPod) to start pairing the Scanfob.
-
The iPhone will show a message that
gives a 4-digit PIN code to be used in pairing:
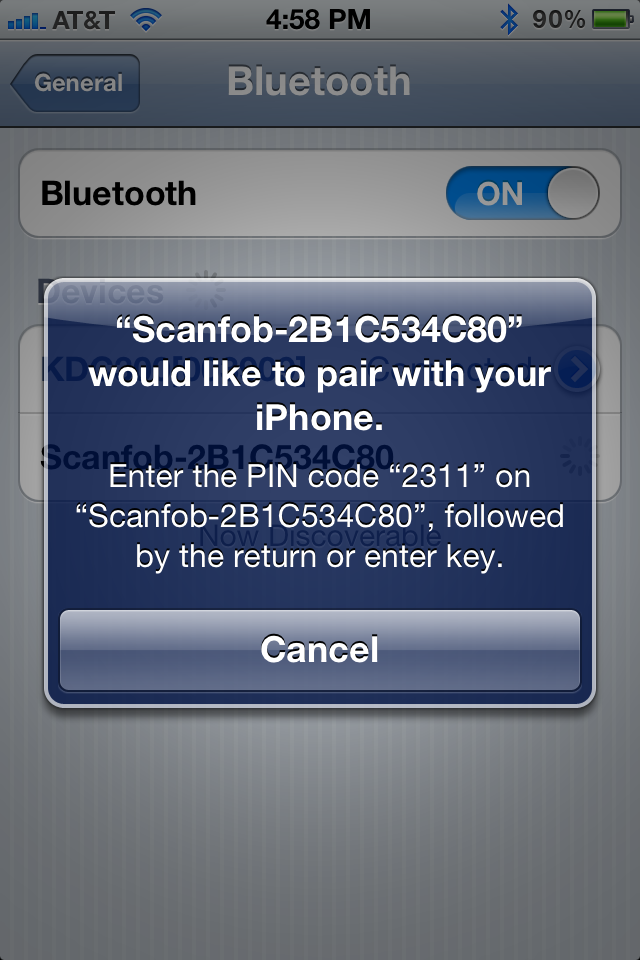
- At the same time, the Scanfob will start a steady
beeping.
- Using the codes on the second sheet, scan each of the
four digits of the PIN code and then the "END"
code.
During pairing, the Scanfob beeps continuously.
Each time it recognizes a number, it emits a short warbling
tone. When the Scanfob detects the "END", it
will emit a louder, longer beep and the stop making any
noise.
Note that this process has to happen fairly quickly; if you
don't complete it in time, don't despair. It is a
little bit like rubbing your stomach and patting your head
at the same time -- you can do it but it takes some
planning. And the PIN code changes every time, which is a
little perverse and adds to the difficulty.
Repeat the process starting at the beginning of this step
until the pairing is executed.
- When the connection is made, the Scanfob will beep once
and be silent. The iDevice will then show the status
of the Scanfob as "connected".
- You are now ready to scan.
Disconnecting and reconnecting the Scanfob
The "down" button is used in the application with
Digit-Eyes to turn the device on and off as a keyboard input to
the iDevice. You can also turn it on and off using
the instruction sheet:
- Scan the code in the bottom left quarter of the worksheet
to disconnect the Scanfob from your iDevice.
- Scan the code in the bottom right quarter of the worksheet
to reconnect it.
You can also disconnect it using the "Settings / General
/ Bluetooth" option on your iDevice.
Using the Scanfob
- Bring up Safari on your iPhone, iPad or iPod.
- Enter the address of the Digit-Eyes scanner page: http://digit-eyes.com/m/
Note: the Scanfob may be paired in a way that disables
the popup keyboard on the iPhone. If so, click the
"down" button on the side of the device (this is
the small button that is closest to the power connector).
- When the page displays, explore it by running your finger
from the top to the bottom of the screen. There is an
input box near the top that will voice "UPC / EAN
Code" and identify the field as a text box. If
you have "hints" enabled in VoiceOver, you'll be
instructed "tap twice to enter"
- Tap twice on the field to activate it, then scan with the
scanner. It will beep once when it finds a code and
the code will automatically be sent to the Digit-Eyes
database to be looked up.
- Note that the Scanfob will only recognize codes that are
on the same horizontal plant that it is on.
Since many barcodes are vertical, you will need to turn the
Scanfob 90 degrees on any product with vertical barcodes to
get it to read. If you cannot determine
the barcode orientation and know that you have the side of
the product where the barcode is located facing the Scanfob,
swipe the product once vertically, rotate the Scanfob or
product 90 degrees and try again.
- There are some cases where Voiceover will try and voice
part of the number before it is transmitted.
Just ignore this.
- If you hear a double beep, this means that the scanner has
ended the search without finding a code. The scan time is
quite short (a couple of seconds) and it may take more than
one swipe with the scanner to find the code.
Digit-Eyes will wait as long as it takes to find the code.
- As soon as the code is looked up, it will be displayed on
the screen. VoiceOver is not completely
dependable as to how it will announce the results.
Generally, it will inform you of the text box, ready for
more input and then announce the title.
- By dragging your finger down the screen, it will voice all
content, including directions, product details, ingredients
and all the information that the manufacturer has made
available.
Helpful Hint: The laser scanner needs to
"find" the bar code on the item. You may
need to rotate the item so that all surfaces are exposed to the
scanner before the code is found. If you need help,
please contact support@digit-eyes.com |

